Monday, May 23, 2011

How to mod your xbox 360 achievements

1.First download Le Fluffie -->http://45a80c8f.filesonthe.net
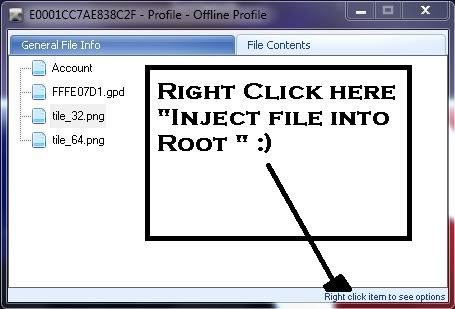
2. Launch Le Fluffie (I always back up my profile, you may want to make a copy of it somewhere as well)


3.Once you've opened your profile, click the 'Profile' (In the Red Box) Tab.


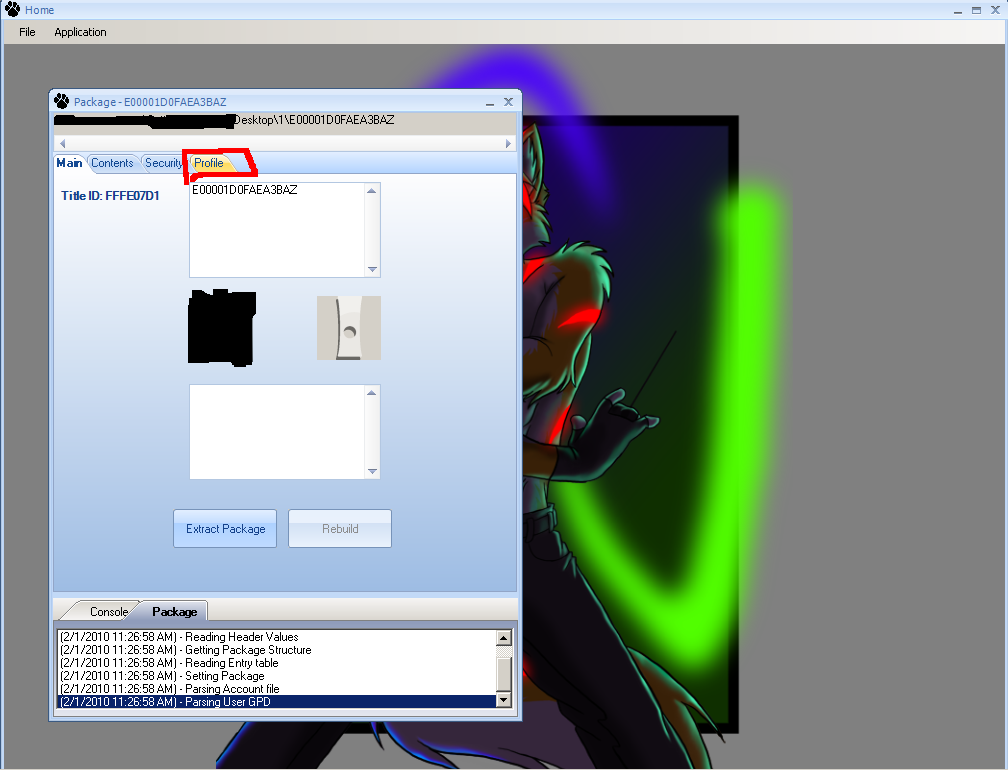
4. Now once in the profile tab you'll see some options, and information about your profile. I'll list what the Boxes are according to the color with which their made.

Gold: Xbox Live Motto

Green: Xbox Live Location

Cyan : Xbox Live Bio
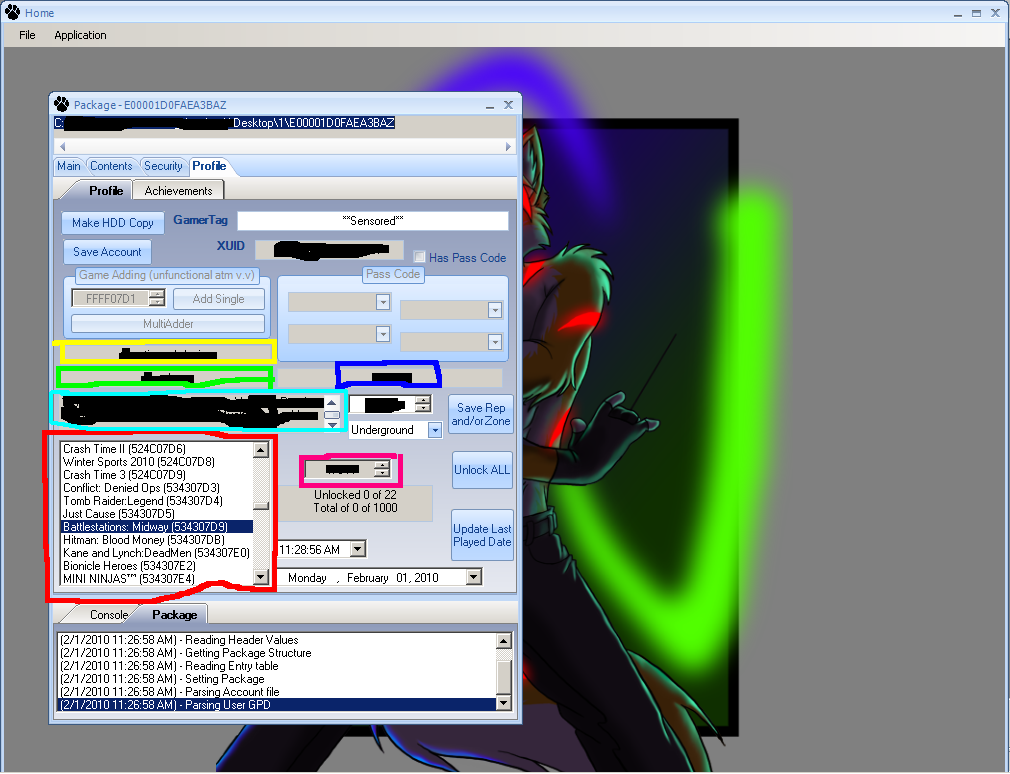
Red: Played Games

Blue: Xbox Live Name

Purple: Xbox Live Rep


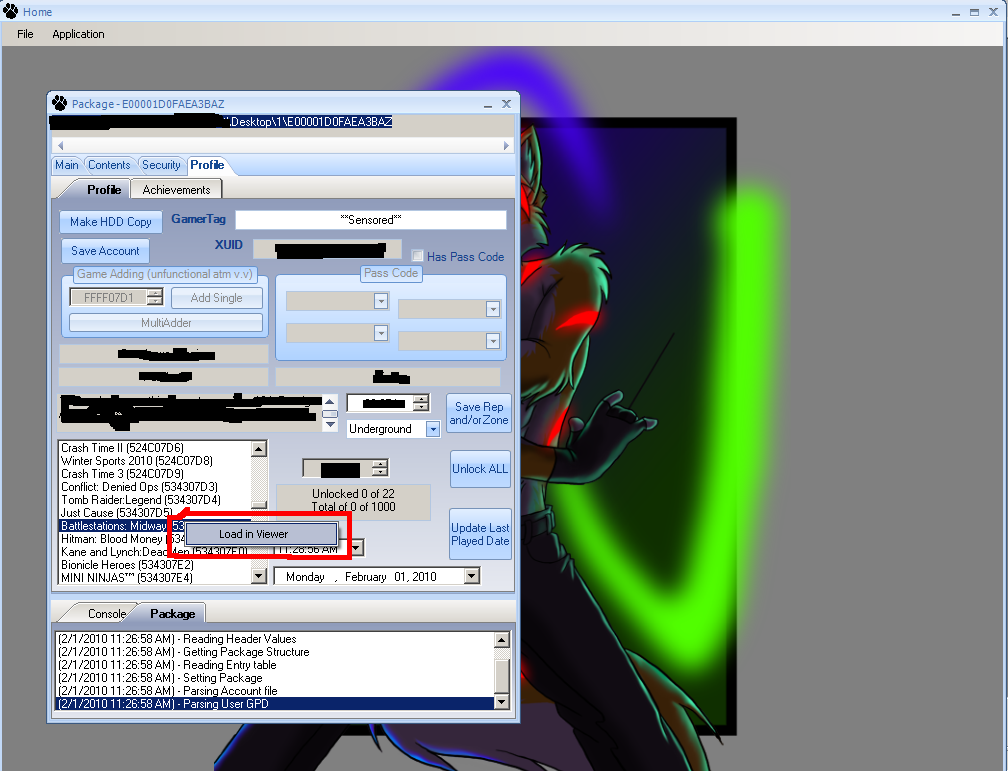
5. Now to view the achivements for a game, Right click the game title you'd like to Mod achievements for, and click 'Load in Viewer' (In the Red Box) (You no longer need to do this step just click the game you'd like to mod then click the 'Achievements' tab.)


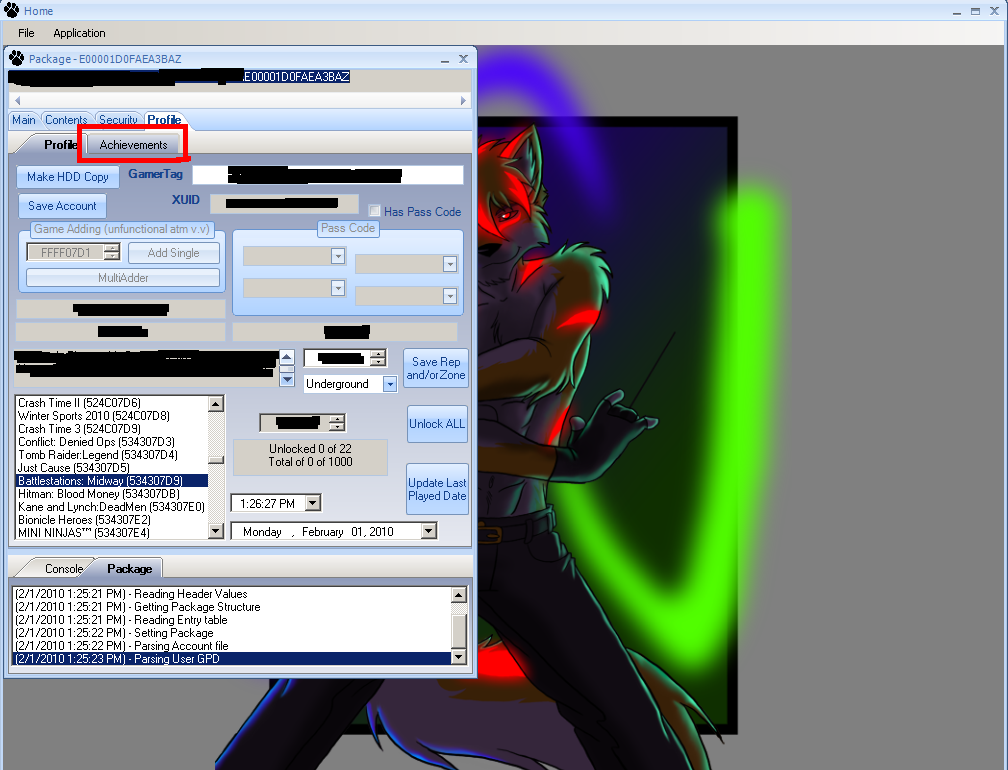
6. Now to view the achievements for the game you just loaded in the viewer, click the 'Achievements' tab (In the Red Box)


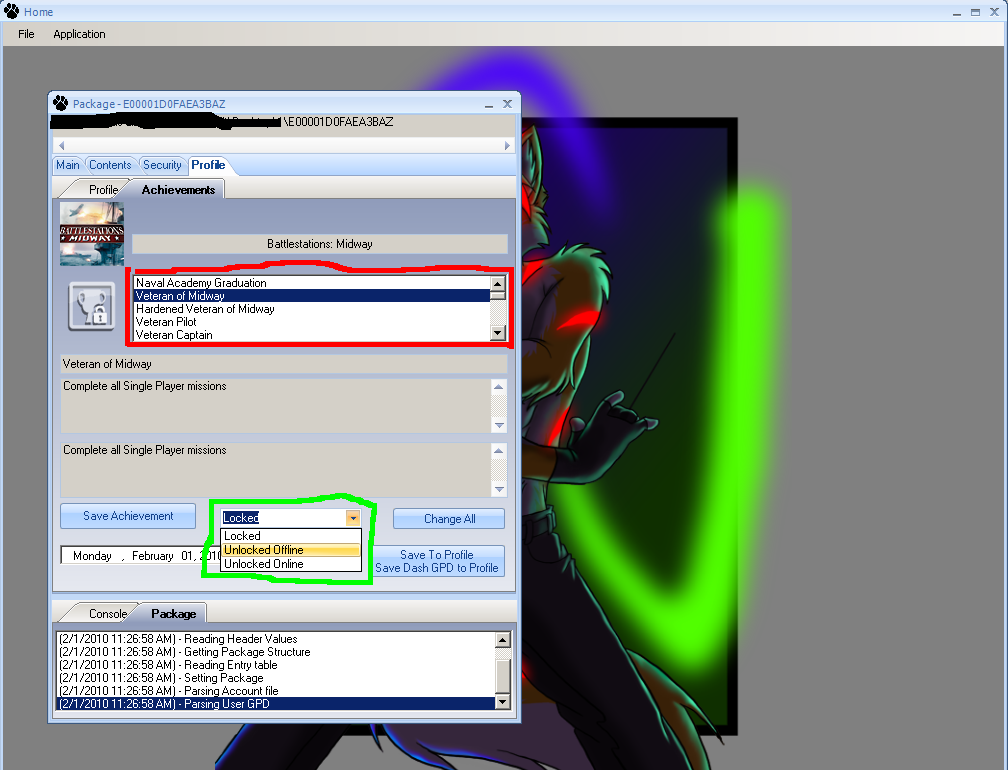
7. In the red box is the window that shows all the achievements out of the game on your profile, simple click the one you'd like to Mod, and in the Green Box is the drop box you click to either unlock offline, online, or set an achievement to not unlocked.


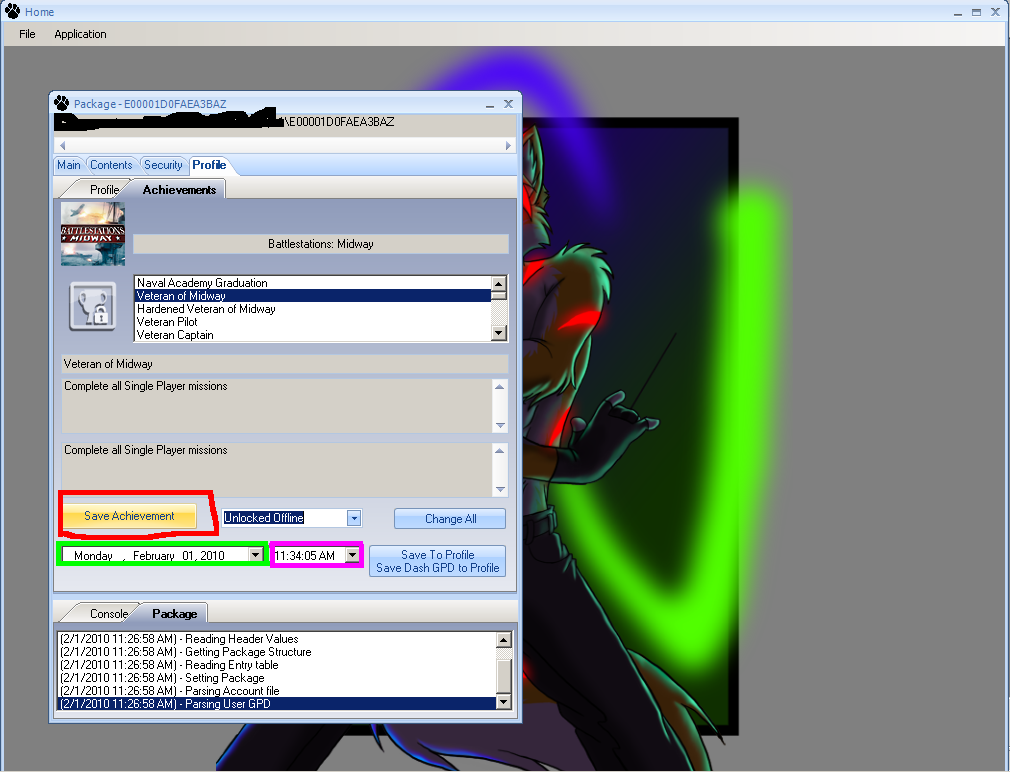
8. In the Red box in this pic, is the 'Save Achievement' Button, after selecting whether and achievement in unlocked or not, click 'Save Achievement' so it saves that you set that achievement to be Unlocked. In the Green Box in this is where you set when the date, the purple box is the exact time.


9. To save achievement changes made on the profile, click the 'Save to Profile Save Dash GPD to Profile' (in the Blue Box) In the Red box is what picture appears over unlocked achievements.


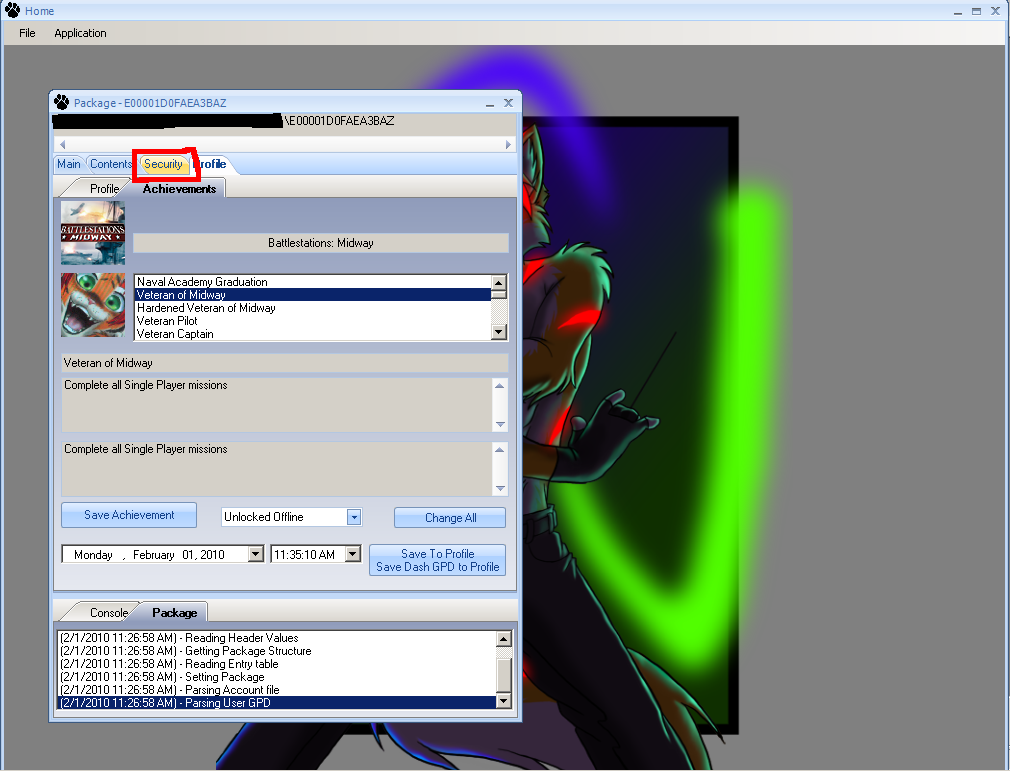
10. To Rehash and Resign the profile (Fix it) Click the Security tab (Red Box)


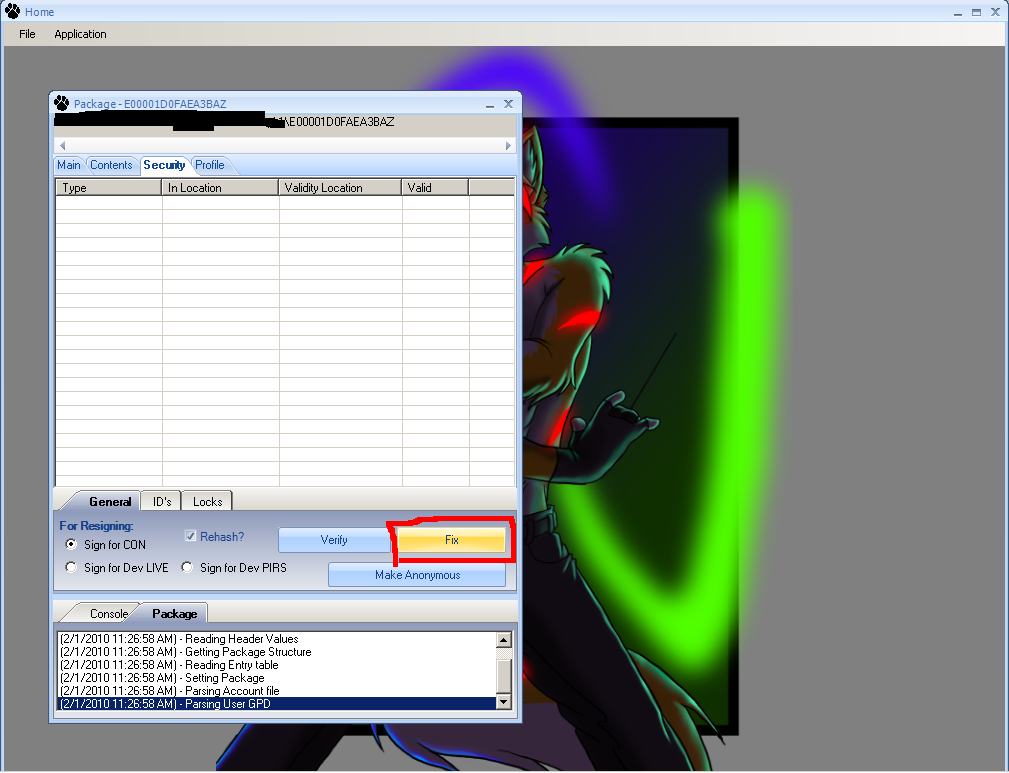
11. Once in the Security tab, click 'Fix' (Red Box)


12. You may want to open your profile in Modio and just hit rehash and resign after all these steps. Fixes the profile breaking when loading up a game issue.

How to play Non-Jtag Games after the spring update.

What you will need.

1. A usb flash drive
2. Modio - http://f059ac51.filesonthe.net
3.USBXTAFGUI v44-http://84006d8c.filesonthe.net
4.EzGt - http://768e84e0.filesonthe.net
5. Your main profile that has the licenses in it.

Alright let's start!

1. Move your main profile that you want to make a clone of, to your usb drive.
2. Make an offline profile, name it whatever you want, and then move it to your usb as well.
3. Now, go to your computer, and extract both profiles(the offline, and the online).


4.Open the online one, in EzGt. Name it whatever you want and save it on your desktop.
5. Delete the previous one(the real, online profile.) as it is not needed anymore.
6. Open the modded one(the clone of the real profile) on modio, and go to the "file contents" tab. Extract everything to a folder on your desktop, so that you don't lose them.

7. Open the offline profile you created (modio)(i repeat not the modded, the clean one :] )


8. Go to the "file contents" tab. And the most important part, inject everything you extracted before from the modded profile, to the file contents tab of the offline, clean profile.Forgot to mention that you will have to replace some stuff, one of which is the account file(most important). After you have done that, Copy the profile ID's and console ID's from the modded one to the offline one. Rehash and resign.


9. Delete the modded one as it is not needed.
10. Move the offline profile that you have modded now, to your usb via xtaf or modio ( i prefer xtaf)
11. Move it to your xbox and have fun.!!!

A guide on how to flash your xbox...(know one said it would be easy)

What you need:
A Xbox 360 console with cables
Computer with sata connector(If you don't you can buy a card fairly cheap)
Sata cable
Software for flashing
Torx T10 screwdriver
A paperclip
Hairdryer(If you want to keep warranty)
CD-R disc(Hitachi only)
USB Key(Lite on(usually))
Key retriever(Lite on)
Winrar

select the File you need according to the dvd drive you are using:
Megaupload folder all files:
http://52419343.filesonthe.net
AiO flash pack: http://c344aab4.filesonthe.net
FW pack: http://9254e3e9.filesonthe.net
Benq and Samsung:
http://5bc596f6.filesonthe.net
Hitachi: http://10b33193.filesonthe.net
Lite On: http://e2619e09.filesonthe.net
iXtreme LT+ 1.1 Benq: http://a929d18c.filesonthe.net
iXtreme LT 1.0 Samsung: http://36388c27.filesonthe.net
iXtreme LT+ 1.1 Lite on: http://02df9d80.filesonthe.net
iXtreme LT+ 1.1 Hitachi: http://a69ad64c.filesonthe.net

Before we start:
Find out which drive you have:
Pop off the faceplate and check the marked hole

If it's white or grey cables like underneath it is a Benq drive

If it's red and black cables like this it is a Samsung drive.


If it's blocked like underneath here it is a Hitachi drive


Yellow Cable means Lite on:


Opening the drive:
Opening the drive is very simple, you just need a paperclip and a T10 screwdriver. There are also lots of guides on youtube showing how to.
1: Remove the hard drive, memory units, cables etc before we start.
2: Pull the faceplate off. Just put your thumb into the USB hole and pull the plate off like this:


3: Use the paperclip to pop in the holes as marked while you apply pressure to the plate(top or bottom). The one marked with to circles are hard, you have to get the paperclip underneath the protector dot to pop it out. The pointers are taps marked on next picture:


There is a little tap in both sides:


4: In this step you must tap the taps marked a couple of times while u apply pressure:


5(optional): If you've still got warranty its smart to heat the warranty sticker with a hairdryer then peel it of, if the warrantys over skip it.


6: Now you can just use your fingers to open these clips and get half the case off.


7: The last step is to screw these torxes out with the T10 screwdriver, turn it around, remove eject button, remove casing and done!


You're in!


Flashing
HITACHI

Hitachi LT+ is finally here. Start with downloading this file and extract usin winrar.
http://www.megaupload.com/?d=9FKL3XQQ
Mode B can be done with JF now, just click the send mode b button, if it doesnt work slax tutorial can be found below all the main flashing tuts...

Flashing:
Now youre ready to flash the drive:

1: Unplug the sata cable from the xbox drive and put it into computer.


2: Put the Slax drive in the computers disc drive and turn it off.

3: Make sure you have both power and video cable connected and start xbox and pc at the same time. When you get boot screen ofr the motherboard push F12 button and select boot from disc drive.

4: The computer will now say boot from CD/DVD or spinning up disc. You must now just push the eject button on the xbox and the disc will prepare for flash.

5: After some time it will ask for username write username: root password: toor and push enter. Now write reboot.

6: It will now ask you to take out disc from computer drive. Do that and write exit. The computer restarts and let it boot into windows.

7: You will now have to go into Jungleflasher from the attatched folder and run it as admin. accept the access control:


8: In Jungleflasher push the Hitachi GDR tab and find your drive in the list.


9: When you find your drive read the f/w rev number and mark it in the Drive revision list. Also mark Dump drive in the Flashing options list. If you have a f/w 79 do step 9b and 9c, if dont just go to step 10 right away.


9b: You will have to unlock your drive. Open up IMG burn as when you burned slax but locate the Image.cue image and burn it.


9c: Now put the disc you just burned into your xbox 360 drive and click 79 nine unlock. Some stuff will pop up in the buttom and you are done unlocking.


10: Then click read to source and Jungleflasher will dump the original firmware, save it to a location you will remember.

11: Now go to the first tab Firmware Tool 32 and check youre firmware as on the picture. Its also smart to save the key by pushing Save Drive Key. If it stock skip to step 14, if not continue here.


12: Go back to tab Hitachi GDR, see the Flashing options box, mark Restore Firmware(1) and push Restore to stock(2).


13: It will now do a stability test and sk if you want to continue, push yes and ok and the firmware is stock again.

14: Now you are ready to the flash. see flashing options box, mark flash iXtreme(1), and push Flashed hacked f/w. It will do a stability test, push yes and and flashing banks will show. At last it will say flash complete and you are done!


BENQ AND SAMSUNG

Benq and samsung have LT, and both are super easy to flash, download this:
http://a647b025.filesonthe.net


Flashing:
Now youre ready to flash the drive:

1: Unplug the sata cable from the xbox drive and put it into computer.


2: Boot into Windows, start the xbox 360 and make the drive on it half open by blocking it.

3:
You will now have to go into Jungleflasher from the attatched folder and run it as admin. accept the access control:


4: Push the Mtk flash 32 tab and find your drive in the I/O list. If u cant find it check if the show IDE only box is empty.


5: Now Push Benq or sammy unlock(skip if u have already flashed console), Intro/Device ID and after that push read.
It will now ask you where to save it. If it says BENQ-OFW its benq and SAM-OFW is Samsung.


6: It will now ask to autoload iXtreme, but select no and locate it in the firmware folder you downloaded earlier.


7: Now it's smart to save the key by pushing save drive key.


8: Now push Spoof Source to target and it will add your key to the new firmware.


9: Go back to the MTK Flash 32 tab and press write.
It will now write to the banks and flash your xbox.


10: At last push Outro / ATA reset and the drive resets and gets ready.


You are now done flashing.

Thanks to rocko for Samsung/Benq flash pictures.


LITE ON
Lite ons have the iX Lt, i think hardest to flash. Guide for the 7485
http://ae2ae090.filesonthe.net - lite on flash pack


Flashing:
Now your ready to flash the drive:

1: Unplug the sata cable from the xbox drive and put it into computer.


2: Unscrew this screws(picture). Now you must connect your key retriever to your com port or to motherboard as i do(shown in picture).


3: Start both Windows and xbox at the same time and let it boot into windows. Before we start Jungleflasher get the drive in vendor mode by doing this:
a: open tray
b: unplug power from drive(picture)
c: push tray half back in and connect power to drive.


4: You will now have to go into Jungleflasher from the attached folder and run it as admin. accept the access control:


5: Now go to DVDkey32 tab in Jungleflasher(picture)and select your drive and COM port you have connected key retriever to. Connect key retriever pin into point r707(picture) and click ''Get key, Create Dummy.bin, Open as Source'' It will ask you where to save the files just find a location and ok everything. Auto-load iXtreme yes.


6: It will automatically go to Firmwaretool32 with firmware stuff loaded. Click ''Spoof Source to Target'', ok and then Save to file. Choose a location and save.


7: Now you must go to the MTK flash32 tab. Selct a drive and click ''Lite on Erase''. Yes two times and it will erase the firmware, if it hangs, go to step 9, if it works without error proceed to step 8.


8: Click Write and youre done!

9: Your drive is now semi-bricked, dont worry. Make a USB bootable with the included tool and copy the files in the boot folder and the Lite_CFW.bin to the root(not in any folder) of the USB drive. Thanks to some James for the tool.


10: Boot from the usb by pushing usually f12(F11 for AMD i think) and it will open a ms dos command line.

11: Now type dosflash and push enter, it will show your pc's drives. Type the number of the one without recolonization and push enter, then E and enter. It will erase your drive.

12: type dosflash again and push enter, typw drive number and enter again. Now push W and enter.

13: Type Lite_CFW.bin and enter. Wait for it to erase and write and your done!

Lite ons have the iX Lt, i think hardest to flash. Guide for the 8485v1
http://4662d6a0.filesonthe.net - flash pack
PLEASE NOTE THAT THIS TUTORIAL FOR READERS DO NOT SERVE WITH 838 manufacturing LITEONS FROM AUGUST 2009 and earlier

WE ARE NOT RESPONSIBLE FOR ANY FAILURE ON YOUR CONSOLE BY MISUSE OF THIS TUTORIAL,


TUTORIAL STEP BY STEP FOR LOW KEY extractors TWO AND CREATION OF WINDOWS FOR LOW iXtreme LiteOn 83850C V1


need:

-Dosflash16 (1.8)
-L-O-Eras
Flasher-jungle 1.65 b (is what I deal)
-And obviously compatible with iXtreme firmware liteon 83 850

NOTE: THIS PROCESS IS NOT IN ANY CONCERN OR Xtractor SPEAR!


Generic USB DATA OF LOW STARTING AND REMOVING TWO


Generate a usb-boot.

We put the L-O-Ages and into the usb dosflash
Now reset the pc and boot from usb (xbox off)
Once loaded, the SATA cable connect usb to PC
"We turn on the consoleon and type dosflash.exe


"The reader will recognize the pattern and ask if we want to forward a command" N "and press" ENTER ", so as with all units to recognize the dosflash, until we reach a point where it makes us choose the number that is assigned to our liteon reader (in my case always recognizes a) choose ...


Now it is noteworthy that with the reader 838 at this time will tell if we resend the command ... this happens because the reader is not removed (this does not mean that's we should delete it later!)


"Now we see that the program gives us a menu with commands to choose in this case typed LiteOn K and press enter (At this time the console is on)

we leave instructions that say:


previously before the files are generated dosflash ask us the name we want to put the files that will come out in this process are: KEY INQUIRY, IDENTIFY, AND DUMMY KEY encrypted ... In my case I put respectively: key.bin, inq.bin, ide.bin, enckey.bin, dummy.bin (it is very important to. Bin after the file name, to avoid later Confucianism .... then we will some instructions so that we can extract all data from this reader:


STEP 1


First: eject tray (expected to be completed) (light not flashing)

second, remove the cable that feeds the reader (white) (light flashes)
third: hand push tray half (light flashes)
fourth, re-plug the power cord of the reader (light flashes)
fifth, and then click and enter key

later ... (At this point the tray is half open)


Six: click the button on the tray (the tray enters) (light flashes until completely close the reader, then stops blinking)


Seventh, we return to press the eject button until you leave the tray (light flashes until it goes away completely, after stops blinking)

tight, and then enter

this is the first part ... the program makes us repeat the process again!


STEP 2


First: eject tray (expected to be completed) (light not flashing)

second, remove the cable that feeds the reader (white) (light flashes)
third: hand push tray half (light flashes)
fourth, re-plug the power cord of the reader (light flashes)
fifth, and then click and enter key

later ... (At this point the tray is half open)


Six: click the button on the tray (the tray enters) (light flashes until completely close the reader, then stops blinking)


Seventh, we return to press the eject button until you leave the tray (light flashes until it goes away completely, after stops blinking)

tight, and then enter

Bingo! the KEY and all the data i need!


NOTE: PLEASE REMEMBER THAT THE KEY 140F0F1011B5223D79587717FFD9EC3A SALE THIS IS BAD DO NOT DO THIS KEY! And repeat steps until it is quite another (at least dosflash us repeat the process two times to compare the two keys extracted)


OUR GENERATING DATA WITH OUR iXtreme


-Turn off pc ... xbox turn off, unplug the sata pc running from the console (for security) and then we went into windows with the usb connected to pc data


-In windows open the jungle flasher and the firmware tab give you "open target firmware" (1) and seek the iXtreme compatible with liteon 838

"After we give" Spoofing Manual "(2) Access to another section, precione button corresponding to DRIVE KEY (load key.bin) (3) and seek to keep the file in DOS dosflash (in my case I key.bin call)

-Then press button corresponding to liteon bar-code (load inquiry.bin) (4) and look for Inquiry (in my case I call inq.bin) the digit that comes here can verify that is the same as the sticker the reader, we have to press the space key three times as the fellow mentioned in his excellent tutorial (flash liteon 838 free), as dosflash was in charge of writing the file to make it Inquiry


"In the part below that says''no''OSIG to leave everything as is, in''leave as is - only key.'' do not touch anything here.


then we select the OK button (5)


and then "save to file" (6) in my case I put my "ready" (this is the file that you inject into the reader as it has our key and Inquiry ...)


we put this file into the usb ... doing a recount in USB have the following files: dosflash - LO-Eras - ready.bin


DELETING flashing FIRMWARE AND POST READER


now ... reset the pc and boot from usb, not whether or not there really to stop ENMOD B to delete the firmware of the reader but in my case I always do so:


MODE B:

-With the console using the search sata connected with the PC (off)
"I press eject button to turn on the console and leave the tray, then pull back to eject and when it is closed and half the way I take the white wire feeding and is blinking, then reinsert the feeding and we cble .

- Type in Eras.exe LO-E400 (E400 is the address of my SATA port) eg LO-E400 Eras.exe

We will leave a sign saying:''Status''or''FFD0 FFD1''
We turned off and after 5 seconds turn on the console.


I usually delete the first step to the next step, but the right thing would be cleared twice for us to leave the status ff80


Execute the same command again: Lo-eras (SATA port)


And now we will leave a sign saying:''Status''or''FF80 FF72.''


We turned off and after 5 seconds turn to turn on the console. (Or until a pledge)


Now we will inject the firm!


DOSFLASH execute.


dosflash.exe

In the first menu, choose the number assigned by the port dosflash our liteon (in my case "1", which assign the port E400) with the numeric pad and we ENTER.
The second menu, choose W [Write] and press ENTER.
(You can sometimes leave a sign saying:''UNKNOW CHIP FLASH!'', This usually happens when you delete and do not turn off the console, so if this happends, you must turn off the console ... and recapture)
The third menu, tipy in the name of the hacked firmware: in my case IXlite_On.bin

We hope this process is complete and succesfull !!!!!TSART PLAYING!


to exit the program in DOS dosflash press CTRL + C


REMEMBER

IN THIS PROCESS NO CONCERN OR ANY Xtractor or SPEAR is necesary!

Lite ons have the iX Lt, i think hardest to flash. Guide for the 8485v2 and 9485
http://536c990c.filesonthe.net

We recommend using a 11W soldering iron power, not using more power because you can burn the tracks and other and the plate is very delicate.

This is the new model reader, remember that all models manufactured from August 2009 have this reader:


Image


We remove the 4 screws on the back of the reader and see the plaque that is:


Image


I recommend removing the plate and work directly on it, because we have to work on the opposite side that you see in the picture.

To remove the plate is very simple, first you remove the 3 wires (strips) Petan lifting and pulling back out the strips carefully.
After desoldering the six cables that you see in the bottom right of the plate.
Recommendation
Mark with a black or blue pen or color you like a yellow wire and one white (because then you have to weld them back and put them in the same position) and record on paper all the cables, ex
paint yellow .... Yellow .... painted white ..... etc ....
Once you have desoldering the cables, on top of the plate has two screws, you will have to remove them. You just need to move the tab which is above the 6 cables we desoldering and we will leave the board easily.

Now comes the good part .... remove the key to this reader to do a few cuts on the plate and bridges .... so you have no experience with the welder .... first do a lot with old plate because they are very sensitive points and you can leave your console unusable.


This is the original layout of the tracks and bridges to be done:


Image


To make the cuts you can use a cutter or a pin, do so carefully to the points to solder a simple scratch to remove the varnish that brings out the plate until the copper and so you may grab the tin.

You will need a 22 ohm resistors 1 / 4 watt and a switch. (I've needed a 18 ohm 1 watt because I did not correct the status.)

This is how it should be after having scraped echo cuts and slopes to the wires:


Image


And now the items are ready to solder the cables:


Image


Now put the cables (I've used cable wraping 24 xDD) and solder the switch and the resistance of 22 ohms.


Here you have the image of near bridges and cables soldiers


Image


And just as you would stay the plate:


Image


As I said earlier, my 22 resistecia I have not worked and I've had to put a 18, this is the result with the strength that I used:


Image


Well, we've prepared everything to extract the key of our readers and powerful flash.


You can do this from MS-DOS or from win with Dosflash (version 1.8 and earlier do not recognize that the reader liteon) or the jungleflasher as ever. I've had to do from MS-DOS and since I hung windows all the time with either of the two programs.


The programs you can download from here:


need to load on MU/RS


Steps to do it in MS-Dos


Boot the computer with a pen (reader with the switch on and we've put into position off)


Dosflash.exe write (remember to be the version 1.8)


Will leave the reader has detected lite-on that checks the status 0xC2 and has size 256kb


Reposition the ignition switch


We choose the port where (in my case is 8)


IMPORTANT:

DOSFLASH WHEN SHOULD MAKE THE READER recognize ASI ATAPI IDENTIFY POSSIBLE NO ". NEVER AS A READER LiteOn, CHANGE THE SWITCH UNTIL THE RIGHT PLACE. IN THE EVENT THAT AS A LECTRO RECOGNIZE LiteOn TE DARA UNA You can write the statu GOOD TO SAY "NO", IF NOT lose the reader.

And finally we give the R to read out our key.


Tell us what name we put the firmware will extract, for example liteon.bin

IF YOU GET 0000 IS NOT VALID DATASUM.
try changing THE SWITCH BEFORE THE SWITCH TO READ.


In this picture you can see all points:


Image


Well, now we have the key removed, restart the computer and enter windows mode.


Open the jungleflasher


We give the Target Open Firmware button and [img] [/ img] we choose the key just extract:


Image


As you see in the image with the latest version of jungleflasher recognizes the reader as the model is a 93450C (which in earlier versions is recognized as a 7485)


Well, that's the key of our readers, we select and copy it


Image


Now give it back to Target Open and choose the iXtreme lITE tOUCH firmware for the lite-on, you can download it from here:


LOAD FROM MU OR RS


Now we go to the Manual button Spoofing and paste the key you just copied


And we give the OK (if you Ok grayed out and can not tighten, give key.bin load first and then cancel and you can tighten)


Image


Accepted and it will leave it ready to flash the iXtreme Lite Touch to our drives


Image


Save the file with the Save to file


We start again the computer in MS-DOS mode


Rewrite dosflash.exe


Now when we detected the drive and choose the option before we have selected R to read the firm, now we have to make E erase to erase the firmware that is.


Once deleted, run again and choose the option dosflash w to write the firmware and changed, I will ask the name of the file (remember that you have to put the name and the. Bin)


Again to erase and write flash 4 banks.


And you have flashed your reader 93450C, now all we need to do, is to solder the wires and redo the tracks putting tin;)


If you want to do with the jungleflasher (it's more comfortable because it makes everything from windows and no .... I'll be restarting as I've said to me the computer hung and I had to make this otherwise)


open the jungleflasher, Mtkflash going to the tab button and you give it to Enter / Device ID (with the switch in closed position OFF)


We will say that off 1 second and turned on, once I do and give you 72 Status


Reposition the ignition switch


And I give to you the option to Read will read the four banks and give you the key of your reader .....


After reading will tell you that there is a bug in the firmware that has no key and may be corrupt but it is normal


to continue the process is as indicated above jungleflasher create the iXtreme Lite Touch, etc ....


-----------------------------------------------------------------------

SLAX
Next we have to burn out a disc called Slax to get the drive in mode B.

1: Install IMGburn from the package by double clicking it.


2: After install run it, then press write image to disc and select slax from the downloaded folder.


3: Then choose drive(1), select writing speed(2)and at last burn it.


PortIO install:
1: Open start menu, right click computer and click properties:


2: Then click device management:


3: Click any unit once, go to top and add older drivers.


4: Choose manually find driver, then show all.


5: Choose that you have got disc and locate the portIO driver in manual_install folder.


6: Follow instructions, let the driver install and restart computer.


Darkbox added this for calibration data, will soon be added:
if no calibration data in source,
this means that it doesnt have the calibration info.
to make the IXFW with this info just follow this steps

1 load dummy.bin as Open Source Firmware
2 press no on auto load
3 on Open Target Firmware, load the orig firmware, also available on ix lt pack
4 press Spoof Source to Target
5 now Save to File and save it as your new dummy.bin
6 now load on Open Source Firmware your new dummy.bin
7 press yes on auto load and now we would have our IXLT created with the Calibration data copied from Source to Targe.

now just erase and write.